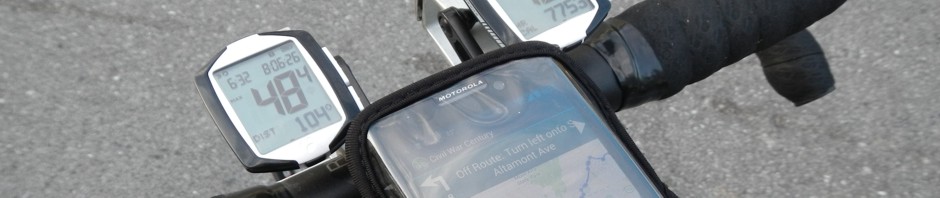
 I can’t count the number of times I’ve been asked, “What’s that stuff on your handlebars?” I’ve been a tech-weenie for over 30 years. I’ve considered navigation units, fancy cyclocomputers and other gadgets. I already keep my smartphone charged and with me. Therefore, I’m reluctant to carry more electronics that I must mount to the bike, learn to use, remember to keep charged and recharge during long rides. Instead, I opted to make the best of my smartphone with Andriod apps. This photo shows the smartphone strapped to the stem over top of an external battery pack. Here are details about my equipment:
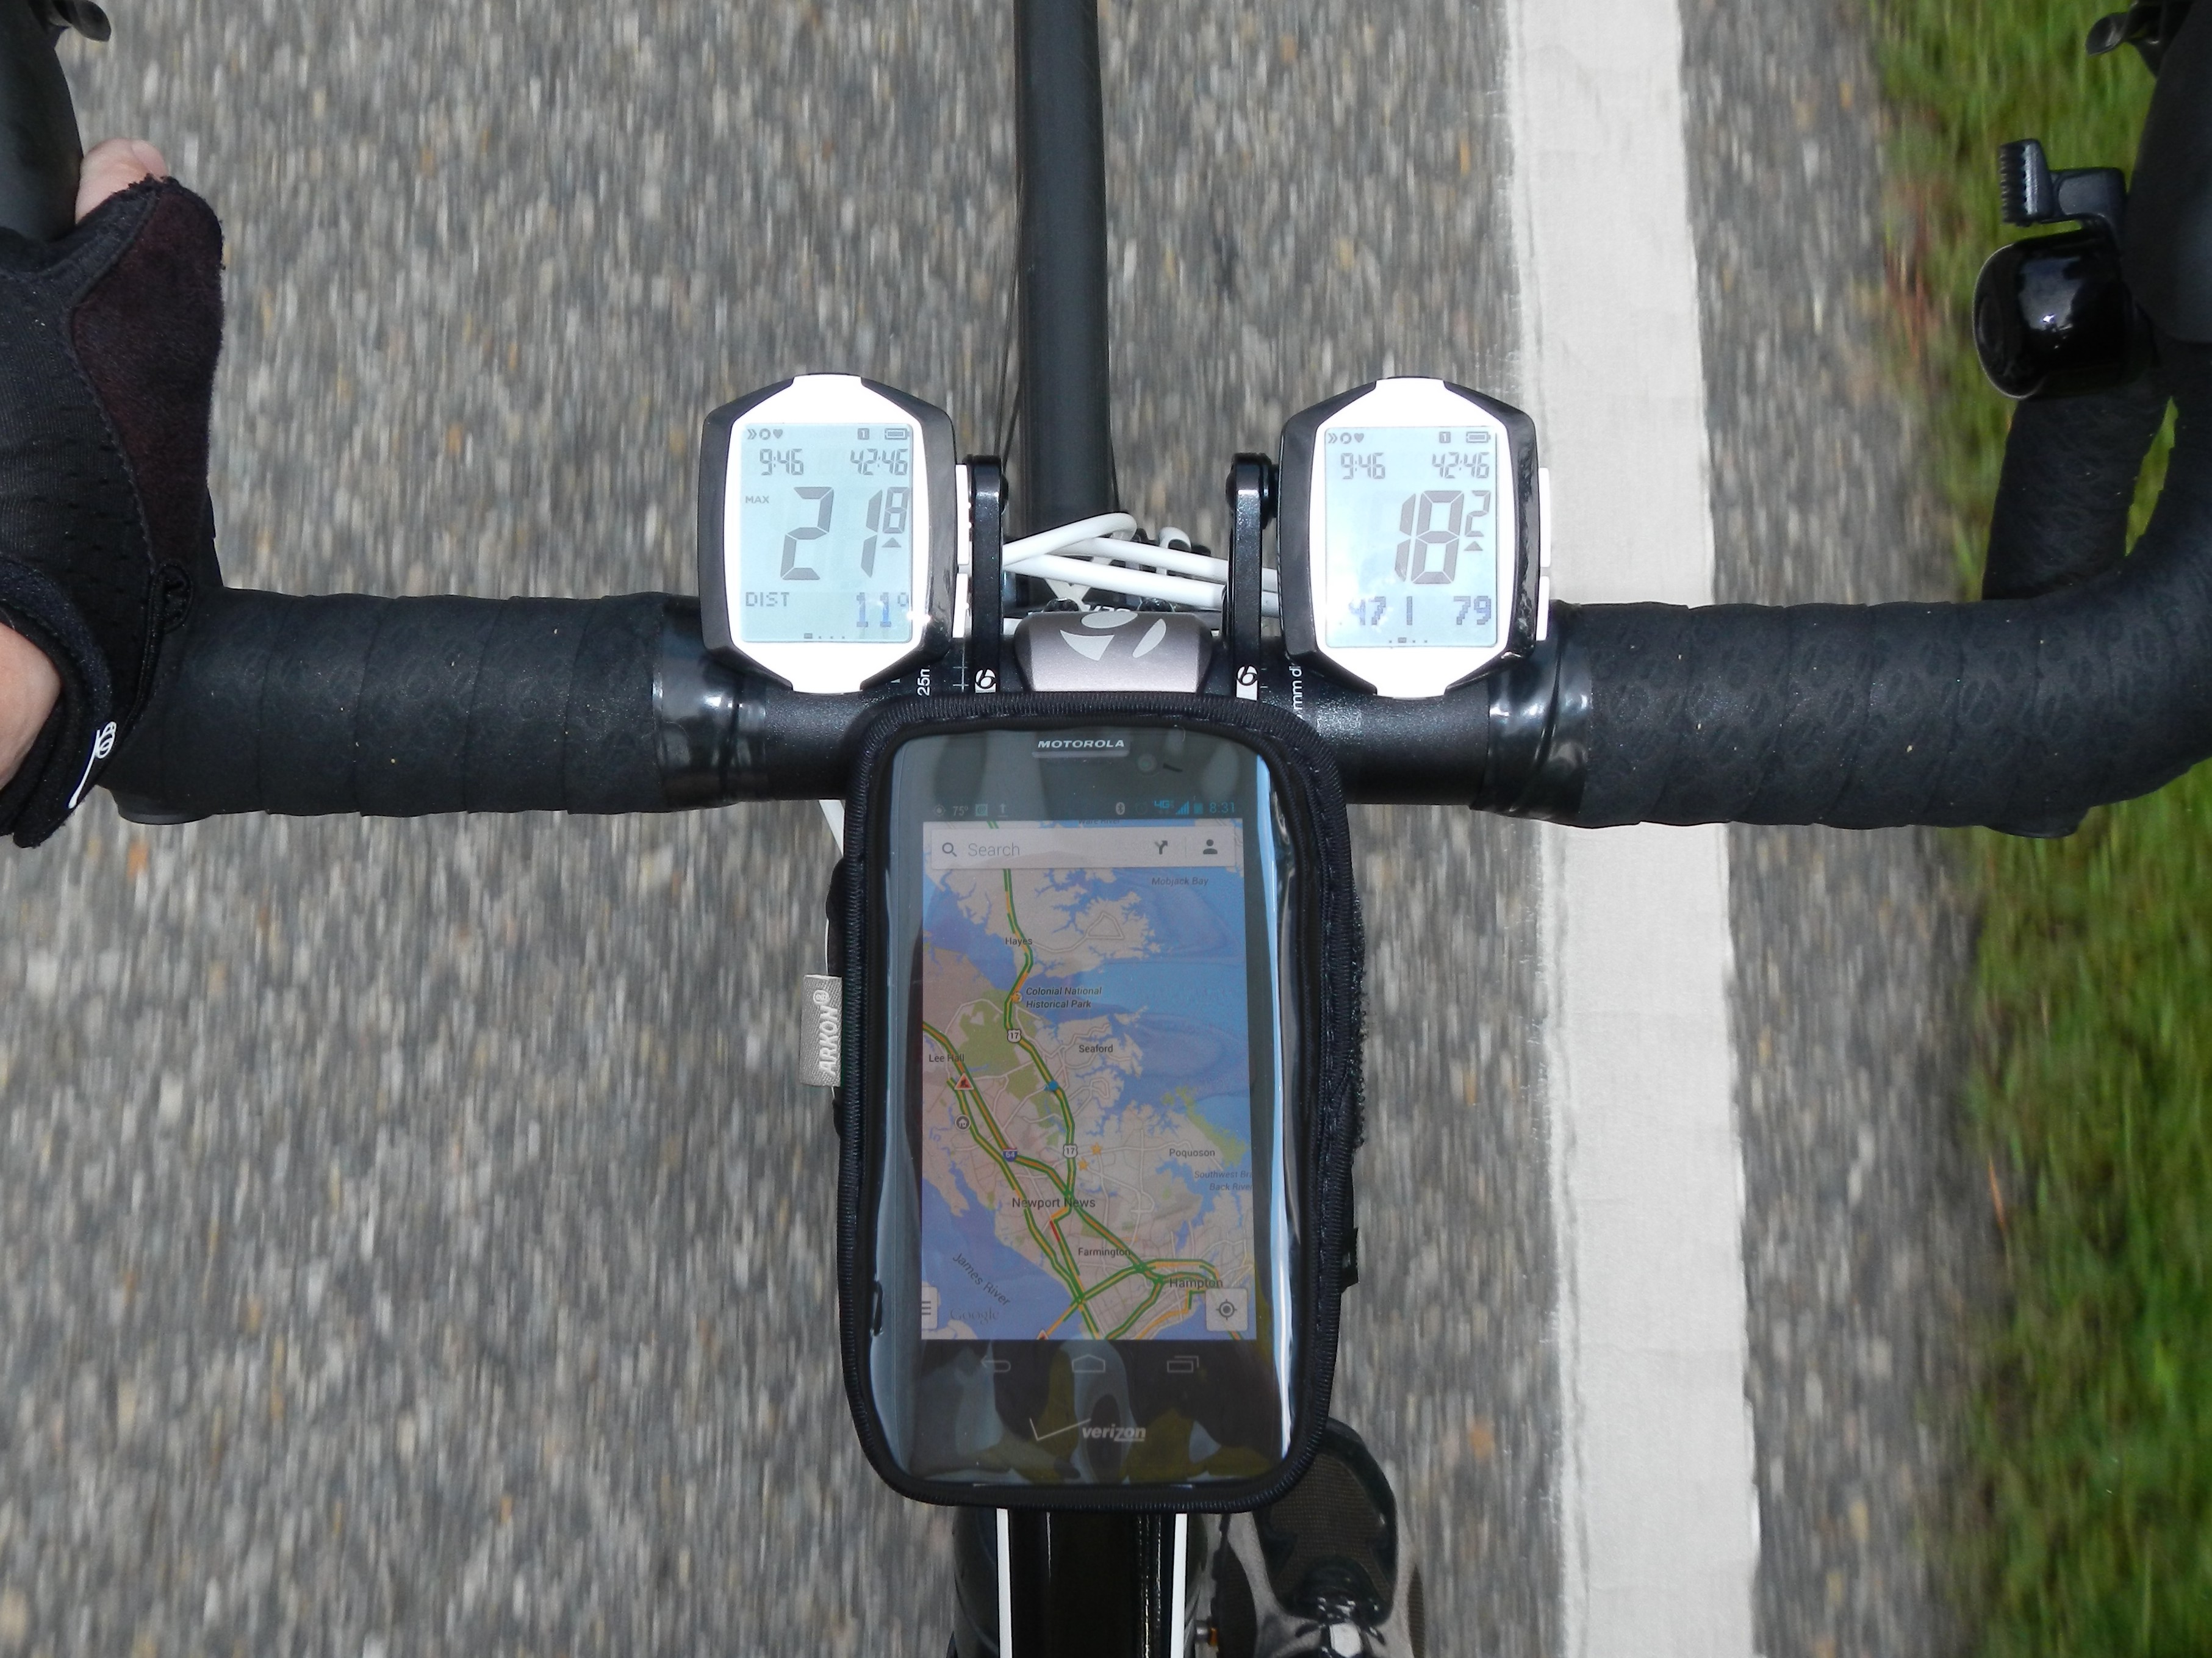
 My Node computers (photo above) cover almost everything I want to know. I mounted them on Bontrager computer mounts to keep them centered on the handlebars despite having bag mounts installed there. Both Nodes receive wireless speed and cadence signals from a single DuoTrap sensor in the frame (see photo) as well as my ANT+ heartrate monitor. I use a jogger’s arm band carrier to strap my smartphone to the stem and external battery. I use an Anker portable charger to extend battery life to ~30 hours while using GPS/apps on the road. I attach the battery to the bike using a Handy E-Pack with F66 Fixer.
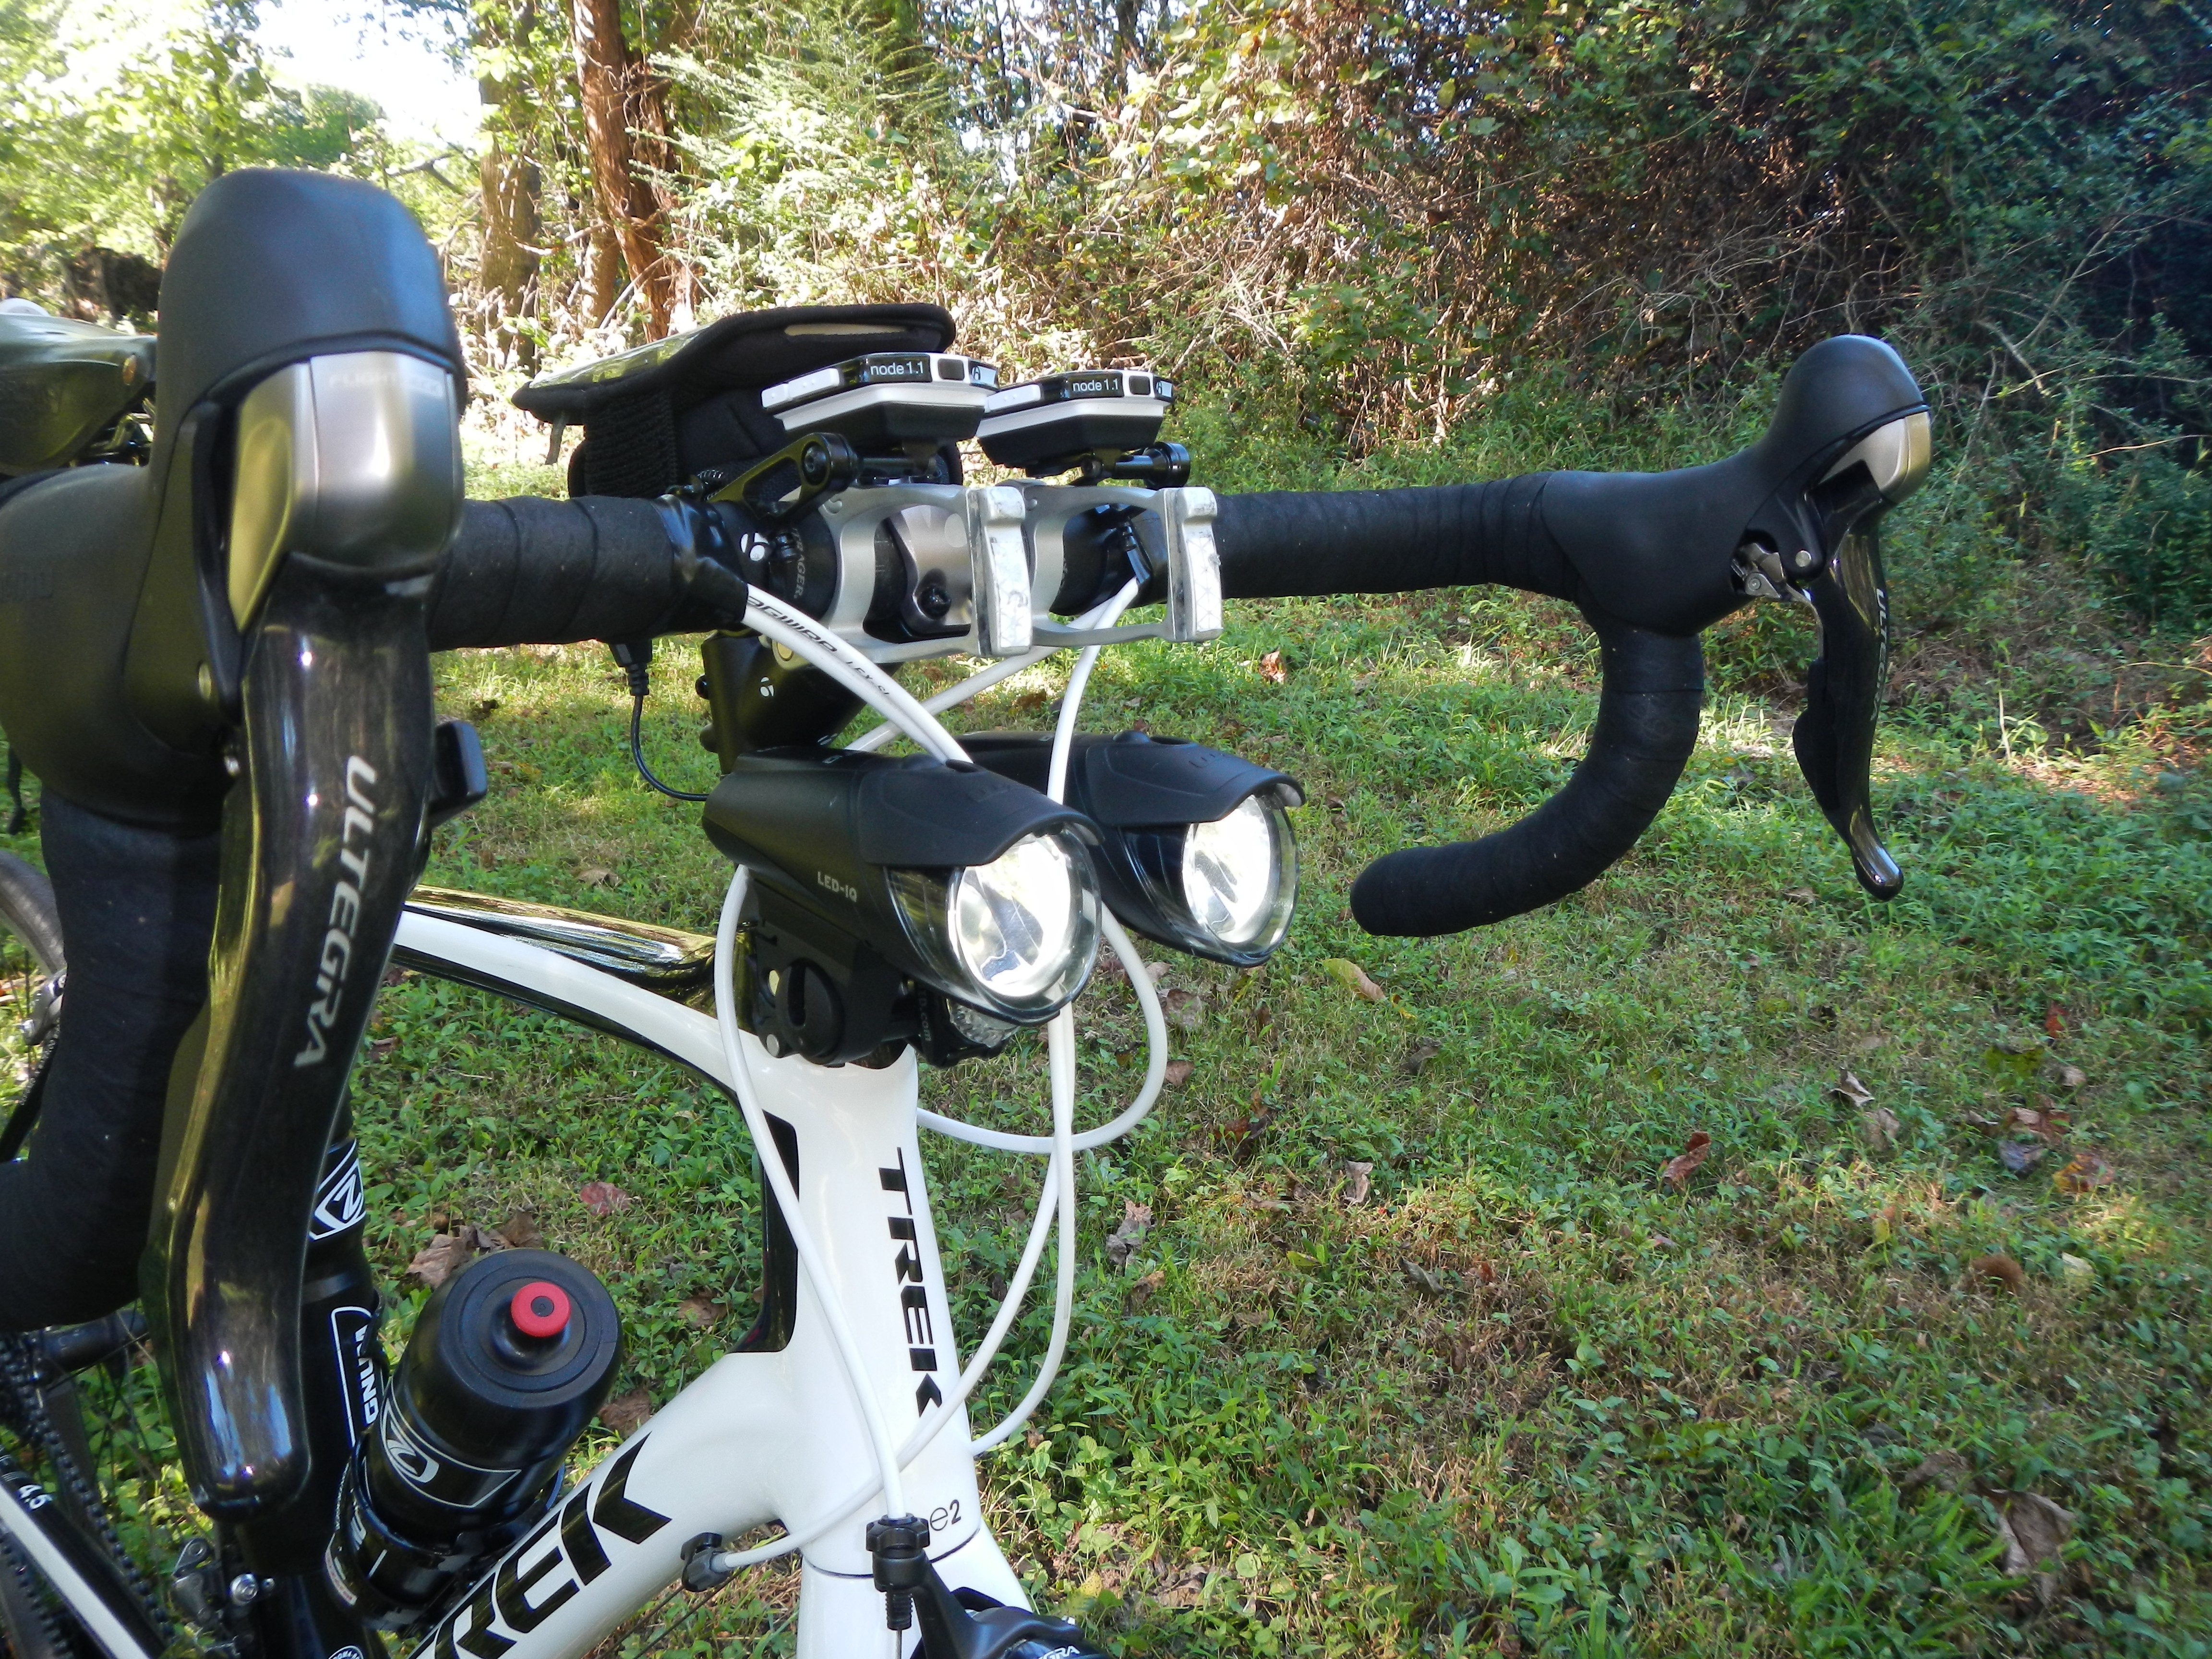 Good lighting is important for riding during the winter as well as during my rando events. I use a pair of B&M Ixon IQ Premiums for their asymmetric beams and longer battery life. I use a Topeak BarXtender attached to the stem to hold my lights beneath my handlebar bag. Having the light mounted lower casts shadows behind road irregularities while I ride. The lights, computer and smartphone easily coexist with the bag. The clean brake and shifter cable routing allows the bag to ride free of obstructions. I carry extra batteries in my handlebar bag. I may have a wheel built around a dynamo hub for endless power! That’s one of those “if the rando bug bites” kind of purchases. 😉 Here’s my product review of the Ixon IQ lights. Here’s a video description of how I mounted my lights to clear the handlebar bag.
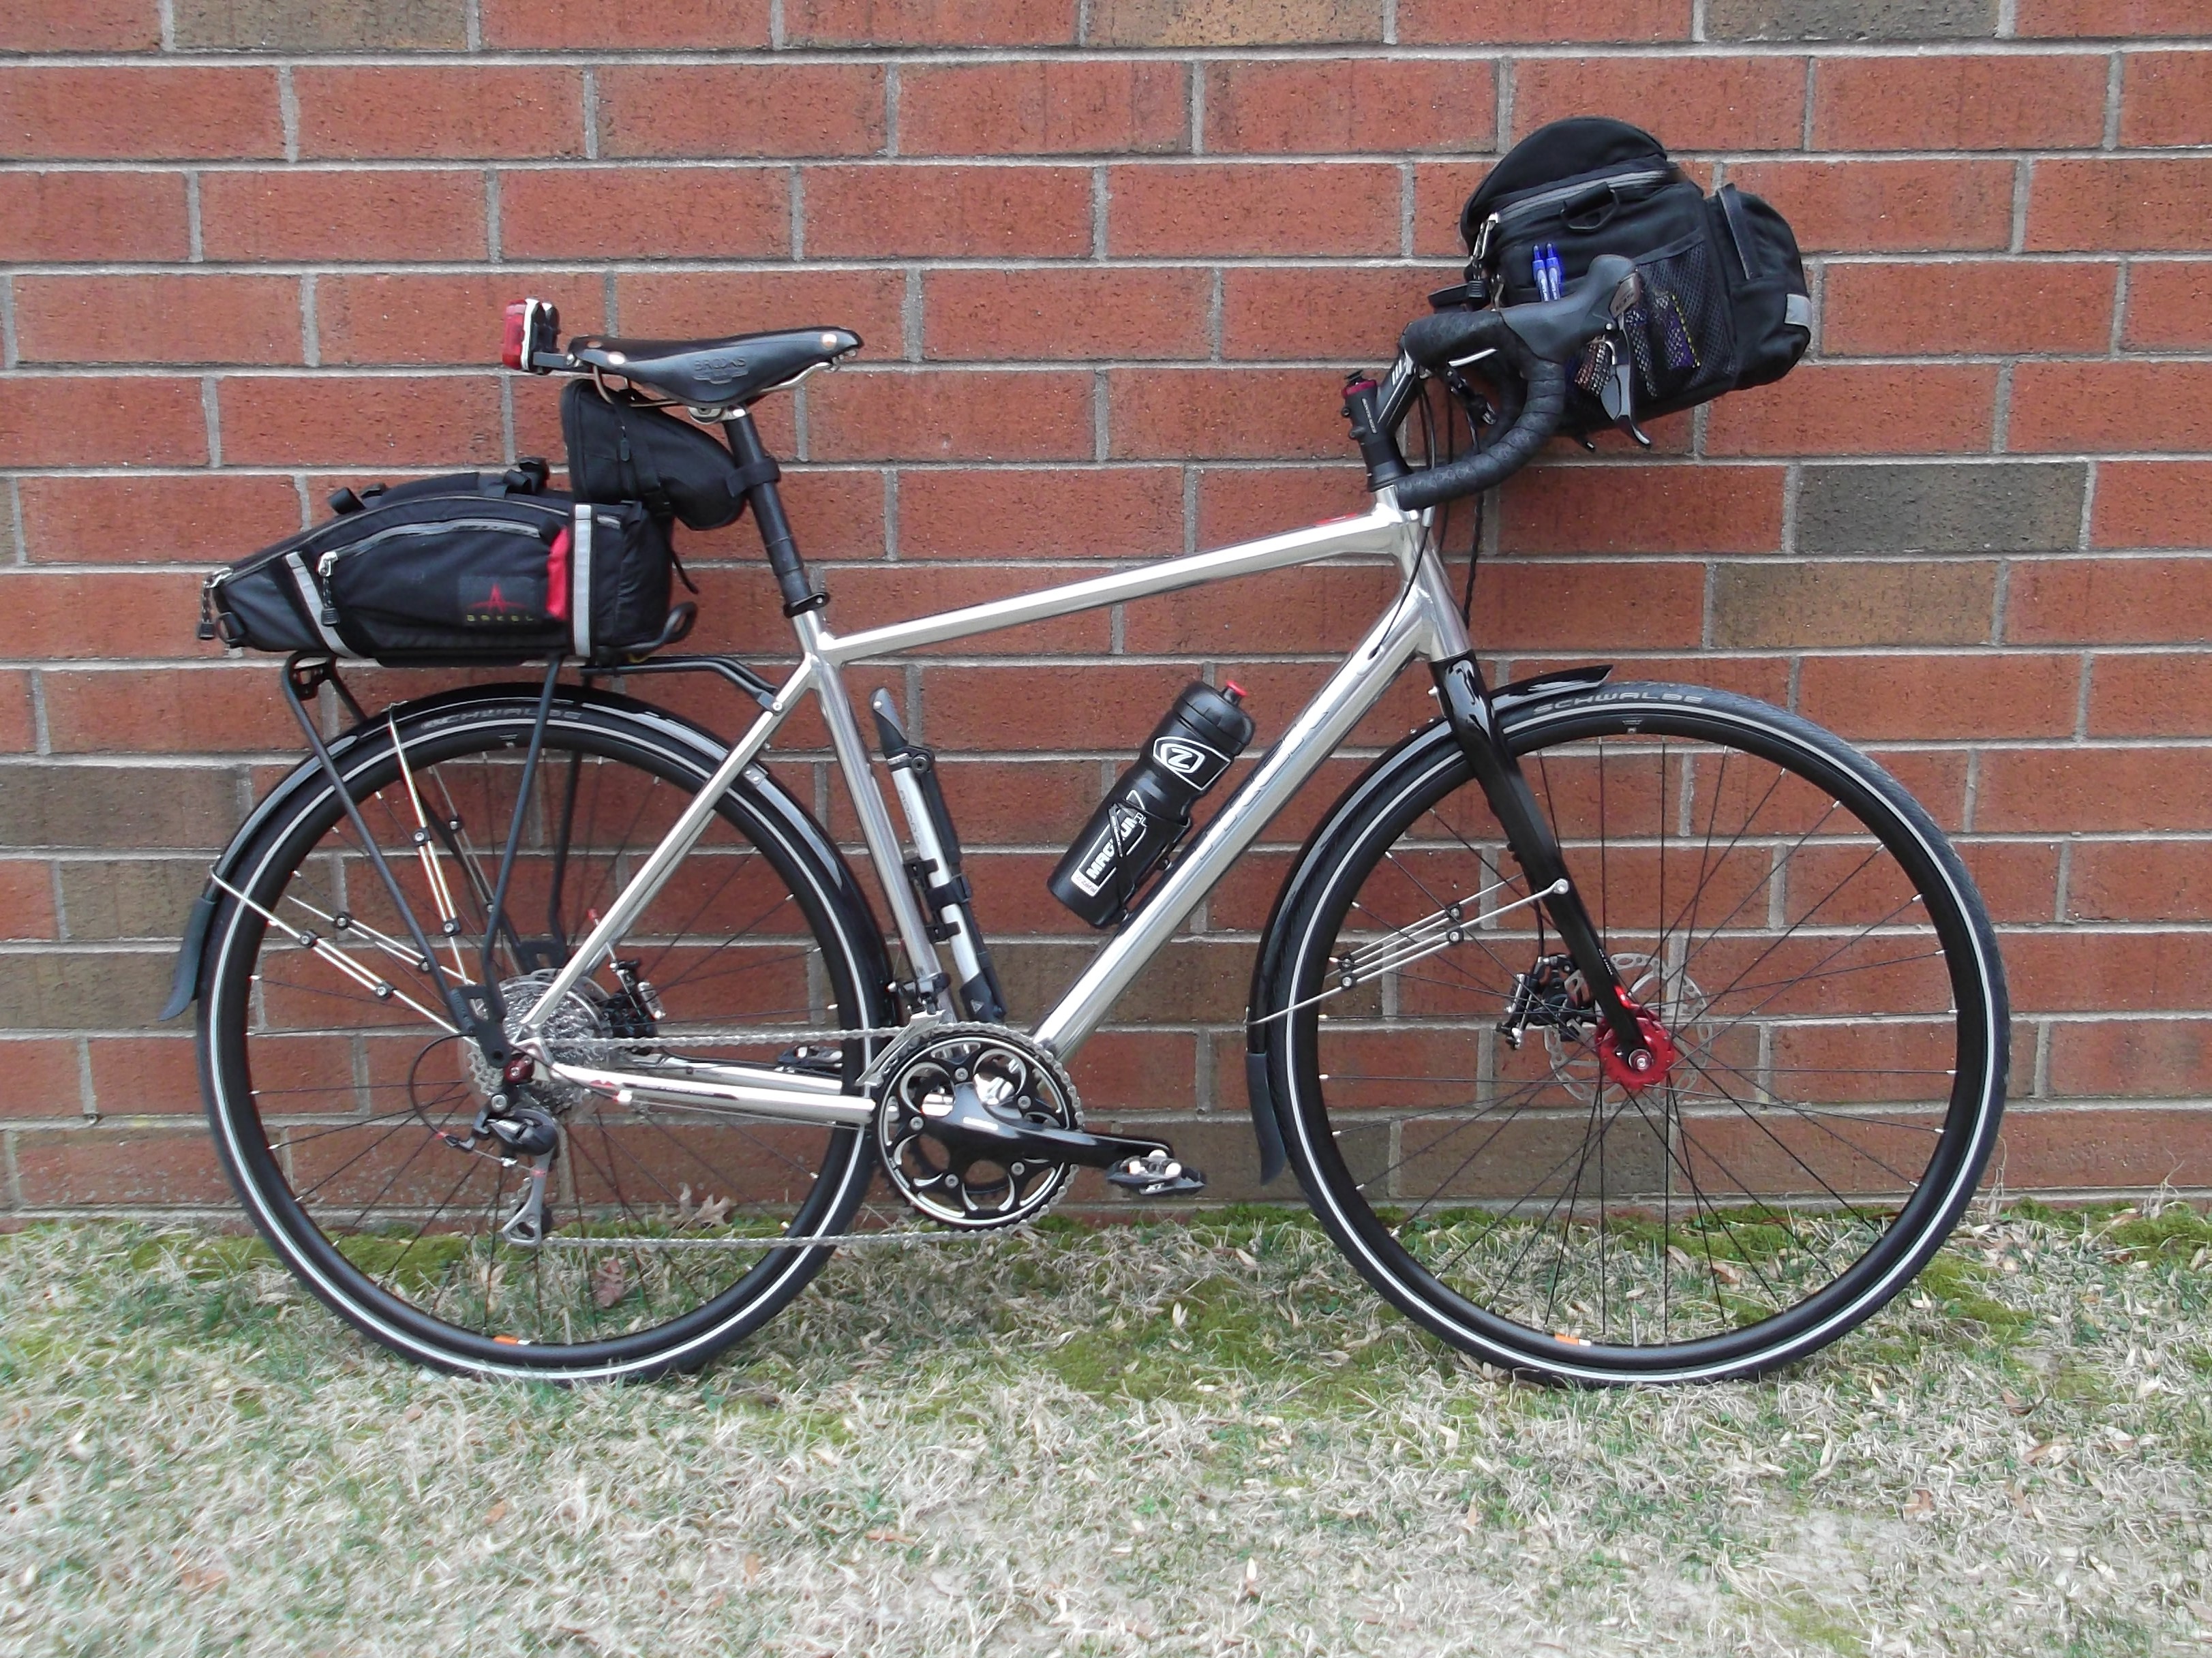 Arkel’s large handlebar bag proved itself quite useful on my second 200km ride. It opens toward the rider and its interior is bright yellow. This combination makes it really easy to find and grab stuff on the go, especially in the dark. It’s far more efficient than stopping to open a trunk bag when time is critical. I mount my Arkel Randonneur Rack w/TailRider trunk bag when I need more storage. It’s a solution that’s friendly to carbon fiber seatposts by clamping the load to seat rails. The TailRider expands outward for increased capacity. Both bags have a rain fly. I’ve ridden many miles in the rain. Everything inside stays dry. Click here to see an animation with the bags. Watch my video review of the Randonneur Rack and TailRider combo.
 Most smart riders carry a saddle bag with at least a spare tube. I’ve stocked mine with things to keep me rolling unless the worst happens. My large Topeak Aero Wedge Pack contains two 700x28c tubes, a patch kit, tire levers, a spare spoke, spare cleats/bolts, tire boots, CO2 tire inflator, mini multi-tool (for quick adjustments), Dumonde Tech lube, Chamois Butt’r packets, a trauma pak (includes 5×9″ trauma pad, 25g QuickClot, 2×26″ of duct tape, triangular bandage, nitrile gloves, hand wipe, two 4×4″ sterile gauze dressings, two 2×2″ sterile gauze dressings, and a 3″ conforming gauze bandage), a 4″ compression bandage (this thing is awesome!) and a separate box which holds tweezers, folding scissors, Advil, insect sting capsules, Immodium AD, latex gloves, and small bandages to keep it all from rattling. I’ve either used or wished I had everything in this bag at one point or another. Watch my video review of this bag.
 What does all of this get me? The Nodes give me quick access to current speed, average speed, max speed, elasped time, current time, heartrate, calories burned, cadence, distance ridden, and other information. The smartphone running a cycling app gives me the same ride data and adds mapping, navigation, elevation changes, route recording, and other info I don’t need to see while riding.
  Best of all, I have an easy view of other apps such as weather, messages from home (no, I don’t text and ride), music, and other conveniences given by the Internet such as the ability to make hotel reservations, hunt down food or find bike shops from the road. The bags ensure I have a high level of self-sufficiency. A light bike is nice. But I’d rather ride a heavy bike than carry a light one. Sure, it’s overkill on a bicycle, but that’s how I roll!
  Click here to see more photos of my bags and gizmos.
Chasin’ Tech,
Scott

Hi Scott-
I have a Domane & am trying to figure out how to mount a headlight below the front bag (for rando rides). The Topeak Barxtender looks good, but doesn’t seem to do what your assembly does. Did you use more than one Barxtender? If so, how did you connect the two?
Thanks,
Dave
LikeLike
Dave – I’m using two Bar Extenders. But the second one is cut up to save a little space and weight. There’s a better view of it at http://www.stealthtdi.com/Albums/BicycleStuff/sideview.jpg. The angle is perfect for my 40-degree rise stem. However, I’m now using a 25-degree stem. The Domane gives me enough headtube and rise to use a lower-rise stem. What I’m trying now is a similar setup that’s attached to the headset spacer instead of the stem. Rather than a stack of 10mm spacers, and certainly not carbon fiber, I’m using a single 30mm aluminum spacer. This allows me to keep the angle just the way I want it. I can also quickly shift to a higher type of mounting when I don’t have the handlebar bag. This is a new development. I do not have photos of it yet. I like the fallen leaves background in the photos with my Madone. I plan to replace them with similar photos of my Domane in the coming months. I’ll be sure to let you know when I have good photos with show me feat. Plus, I need to do some testing to ensure the lights don’t slide around as the spacer moves. It could be a good or bad thing. Perhaps a dab of Household Goop between the stem and spacer will work. But I’ll save that idea for if I actually need it. 😉
LikeLike
BTW, I forgot to mention a cool feature of this setup: once it’s mounted to the stem (or stack spacer), the whole rig can be removed in seconds by removing a single bolt for daytime-only rides. The rest of the mount stays in place full-time.
LikeLike
Dave – I’m uncertain of whether you received my e-mail. Check the third paragraph above for links to a video which shows how I mount my lighting.
LikeLike
Scott, you have a picture of your handlebar bag with a cue sheet in the map case. How difficult is it to see the top part of the cue sheet, due to the curved shape of the Arkel bag and map case? Especially at night I would think the plastic would cause glare from a helmet light. I’m thinking about getting the small bag but I have to be able to see the cue sheet clearly. Currently I’m using a “stand alone” cue sheet holder and no handlebar bag.
LikeLike
Bob – The large bag has enough surface area to allow me to leave two-inches of the front edge of the holder unused. As a result, the map is biased in my direction. The top two lines can be difficult to read, especially at night. But it’s easy enough to bend the round top so I can read the top. As for head-lamp reflection, I do need to be careful and shine the light *over* the map instead of directly on it. That said, I’m not sure if the small handlebar bag will be as forgiving. Being a tad smaller, that may mean that more of the top of the map is on the front side of the rounded-top map case and pointed away from the rider. A possible solution may be to customize your cue sheets so that they fold into thirds and allow you to keep all of it in sight while riding. Good Luck! -Scott
LikeLike
Scott, I watched your video of the tailrider bag and the randonneur rack. Just one silly question if I missed it in the video, what setup did you use to mount the tail light post to the rack?
LikeLike
Oliver – Thanks for posting. I did not cover it in the video because the parts I used are so obscure and difficult to source that it would be confusing to share. BUT, the option I recommend will achieve the same thing: Simply buy a one-inch diameter wooden dowel, cut it to two inches in length, waterproof it, paint it black and then attach it to the underside of the rack by driving a wood screw into it through the existing hole found on most racks. The dowel will simulate a seat post. I’ve added a close-up of my light attachment to my album at http://www.stealthtdi.com/Albums/BicycleStuff/. Good Luck!
LikeLike